Tuesday, August 14, 2018

Electric Fence and Dry Soils

Those that rely on electric fence are all too familiar with its drop in voltage during the dry summer months. A once effective fence loses its shock value and animals become undeterred.

Why?

Firstly, let's cover how an electric fence works. The pulse leaves the "+" terminal of the fence energizer and enters the conductors. An animal touches the electrified conductor, creating a path, for the pulse, to the ground. The pulse travels through the ground/soil to the ground rod, where it enters the energizer via the negative terminal.

The key for this type of circuit is the soil. For the above system to work, the soil must be moist. The moisture reduces resistance against the pulse traveling to the ground rod.

When soils are dry, the resistance against the pulse is increased. This applies to rocky and sandy soils as well.

What's the workaround? There are two basic options:
  • Increase the conductivity of the ground field
  • Install as Positive/Negative Fence

Increasing conductivity

This is accomplished by either adding additional ground rods to the ground-field or moistening the area around the fence and ground rods.
Adding ground rods puts more metal into the soil, acting as an attractant to the pulse. The more attractive the ground-system is to the energizer's pulse, the better able it can direct the pulse back to the energizer. However, if the soils are too dry (resistant) the pulse will not be able to overcome the lack of moisture.
By moistening the ground field or fence line, you are eliminating some of the resistance in the fence circuit. Watering the fence line is practical for short runs, not large paddocks and perimeters. Watering the ground field only reduces resistance in one location.

Pos/Neg

If watering is impractical, a Positive/Negative fence is recommended. A Pos/Neg fence is installed so half of its strands are connected to the fence terminal. They alternate position with the second half, which are connected to the ground system. When an animal touches both a positive and negative strand, the most direct route for the pulse is out the "+" conductor, through the animal, into the "-" conductor which leads back to the negative terminal (via ground rod). This eliminates the need for moisture to aid the pulse in its travel through the soil. The drawback is an animal must touch both a "+ and "–" strand in order to receive a shock. Pos/Neg fences are very effective fences in dry areas.

A third (not widely available) option is the wide impedance energizer. Compared to low impedance units, they are capable of pushing a pulse through a wider range of fence resistances (low to medium) without loss in pulse power. A 6 joule low impedance energizer has an output of .59 joules at 5000 ohms of resistance, a 2.3 joule wide impedance unit has an output of 1.24 joules at 5000 ohms. Low impedance units are far more common and tend to cost less than wide impedance units. If you are in a dry, rocky or sandy area, a wide impedance is well worth the added expense.


Thursday, June 21, 2018

Grass Management for Electric Fence


Grass contacting the lower conductors of an electrified poultry fence.

We've all had it happen. Grass contact. Every blade of grass acts as a small leak in the fence. As you go down the fence line, those leaks add up to significant energy loss.

How can we manage ourselves out of this situation?

  1. Mow. For fences moved daily, weekly or monthly, mow the grass before installation. Set your mower to cut the grass below the height of your lowest strand. 
  2. Trample the grass. Drive or walk the fence line several times to knock down the grass. Anecdotal evidence suggests that the grass will grow horizontally at first before vertically. Giving the grazer some leeway before grass contact occurs. 
  3. Spray. Not popular among grass farmers who spend so much time and energy trying to grow grass. Why bother killing it? I would only do this along permanent fences in an effort to keep off the brush growth.
  4. Adjust the height of your lowest strand. Folks that use multi-strand fences can easily adjust the height of their lowest conductor by sliding the insulator up the fiberglass post (away from power drinking grass).  
  5. Choose an appropriate energizer. Appropriate means a unit with enough output to overcome the weed load. For reference, a 1joule (output) energizer should power 2000' of weed laden fence, or 3-6 rolls of netting.
Other points of note:
  • The longer the blade of grass the longer the pathway from the fence to ground. The added resistance (and maturity of the plant) makes it a poor conductor. 
  • Short, lush plants are more conductive than their longer, older counter parts. They make better pathways to ground. 
  • Don't forget energizer grounding. If the grass is green, not contacting your fence, but you have an inadequate pulse, you may not have enough grounding to redirect the full-power of the pulse back to the energizer. Increasing the ground field increases the ability of the pulse to travel through the soil, back to the energizer.


What to avoid:
We covered what you can do, here's a "What you must NOT do".
If using electroplastic conductors (tape/twine/rope), do not use high impedance, continuous current or weed burner fence energizer.
Why?
The shape and duration of the pulse from these energizers is quite different from the pulse from low impedance energizers. The pulse from high impedance, weed burner or continuous lasts a touch longer and creates a little more heat. What does plastic do when it's heated? It melts. Combine melted plastic with grass contact (which creates a spark) and you have the recipe for a grass fire.

Stay away from energizers that claim both low impedance and continuous current. They are not a low-impedance unit that's safe to use with electroplastic conductors (and or tall grass).

Tuesday, May 15, 2018

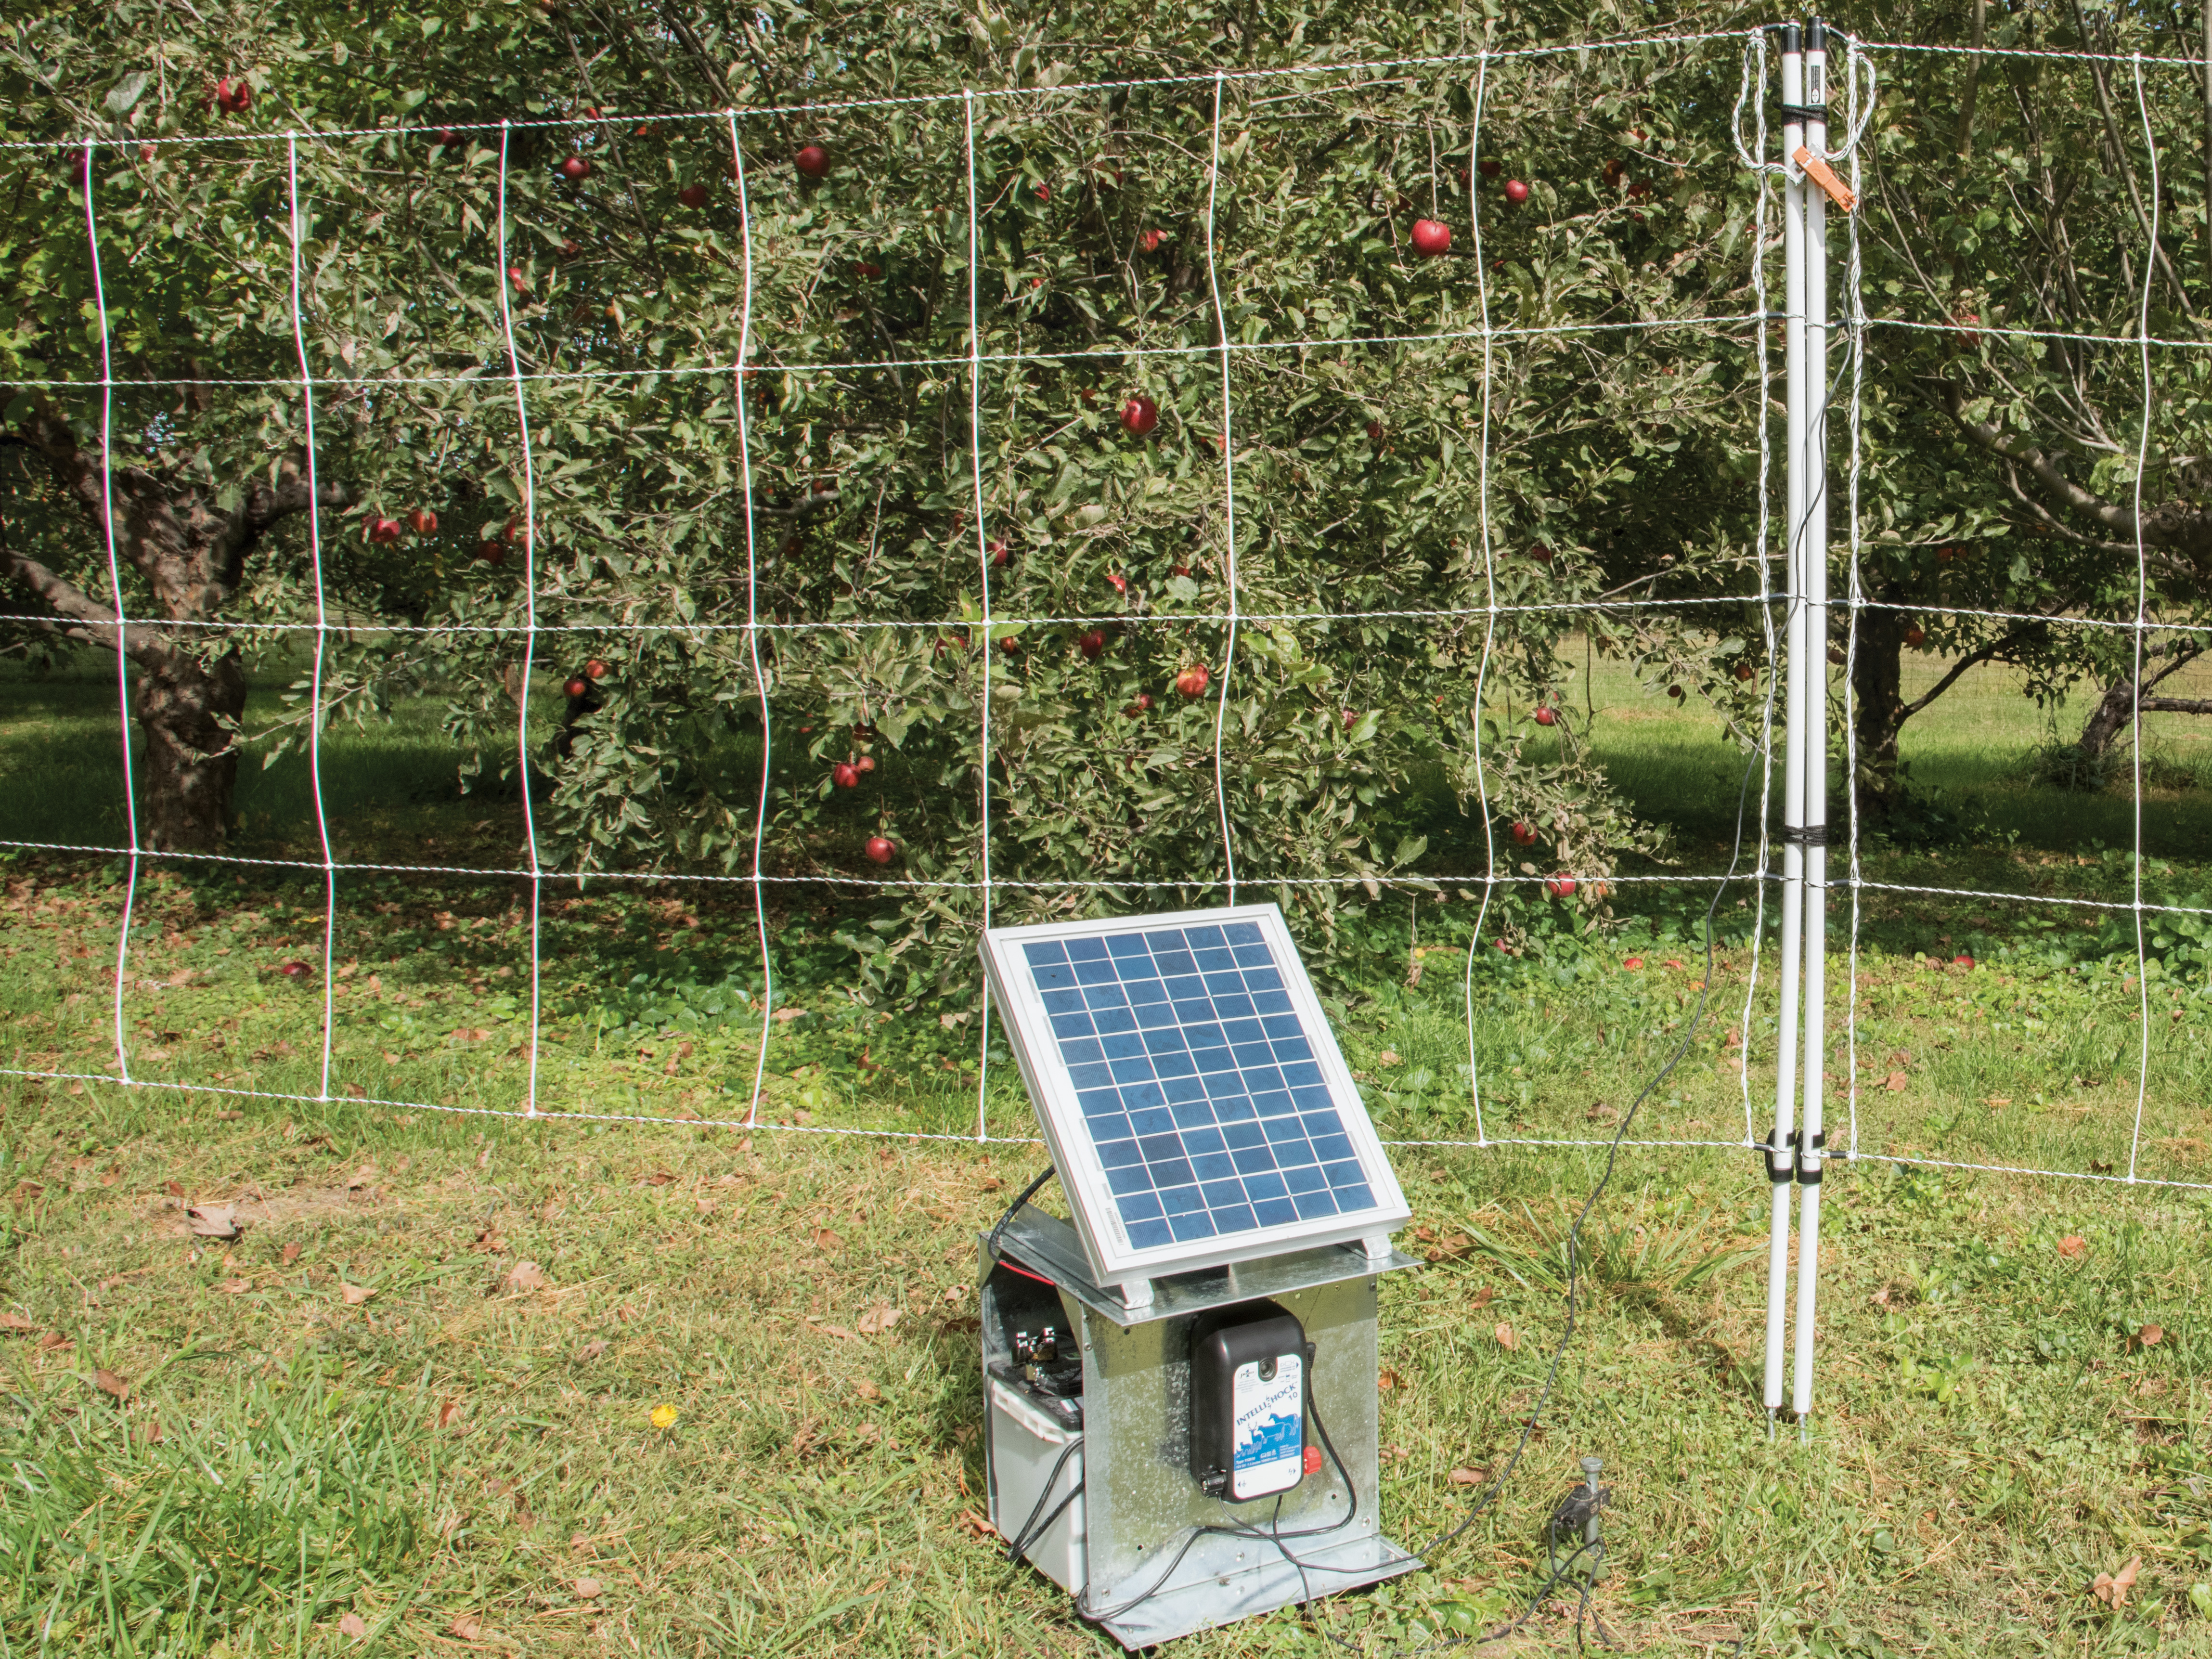
How to pair a battery energizer and solar panel


When choosing a solar panel for your battery energizer; energizer draw (amps), available sunlight per day, and battery size all affect the output wattage needed.  


Determining the solar panel wattage needed to supply an energizer with power is relatively simple. To do so we use the Power Formula, P = EI. P is the wattage required, E is the battery's voltage, and I is the energizer's amperage draw.

Example, an energizer with a 100mA (.1 amp) per hour draw and a 12v battery would require 1.2 watts per hour, 28.8 watts or 2.4A throughout the day. The solar panel needs to supply the 2.4A to the battery in order for it to remain charged.

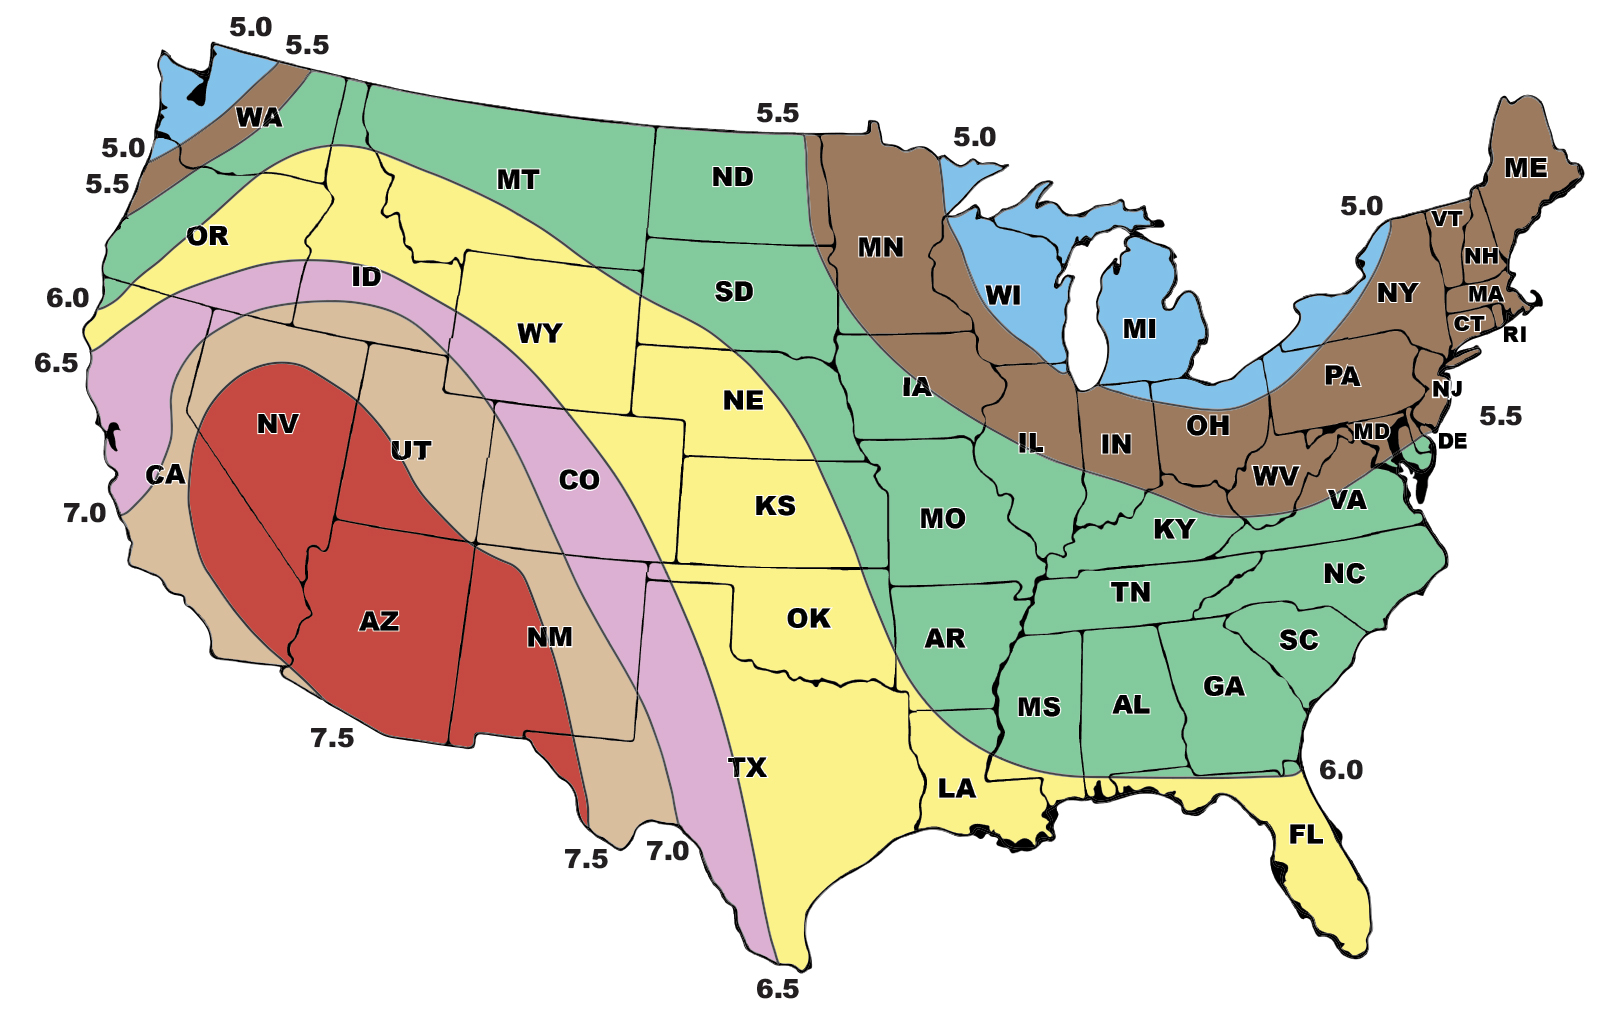
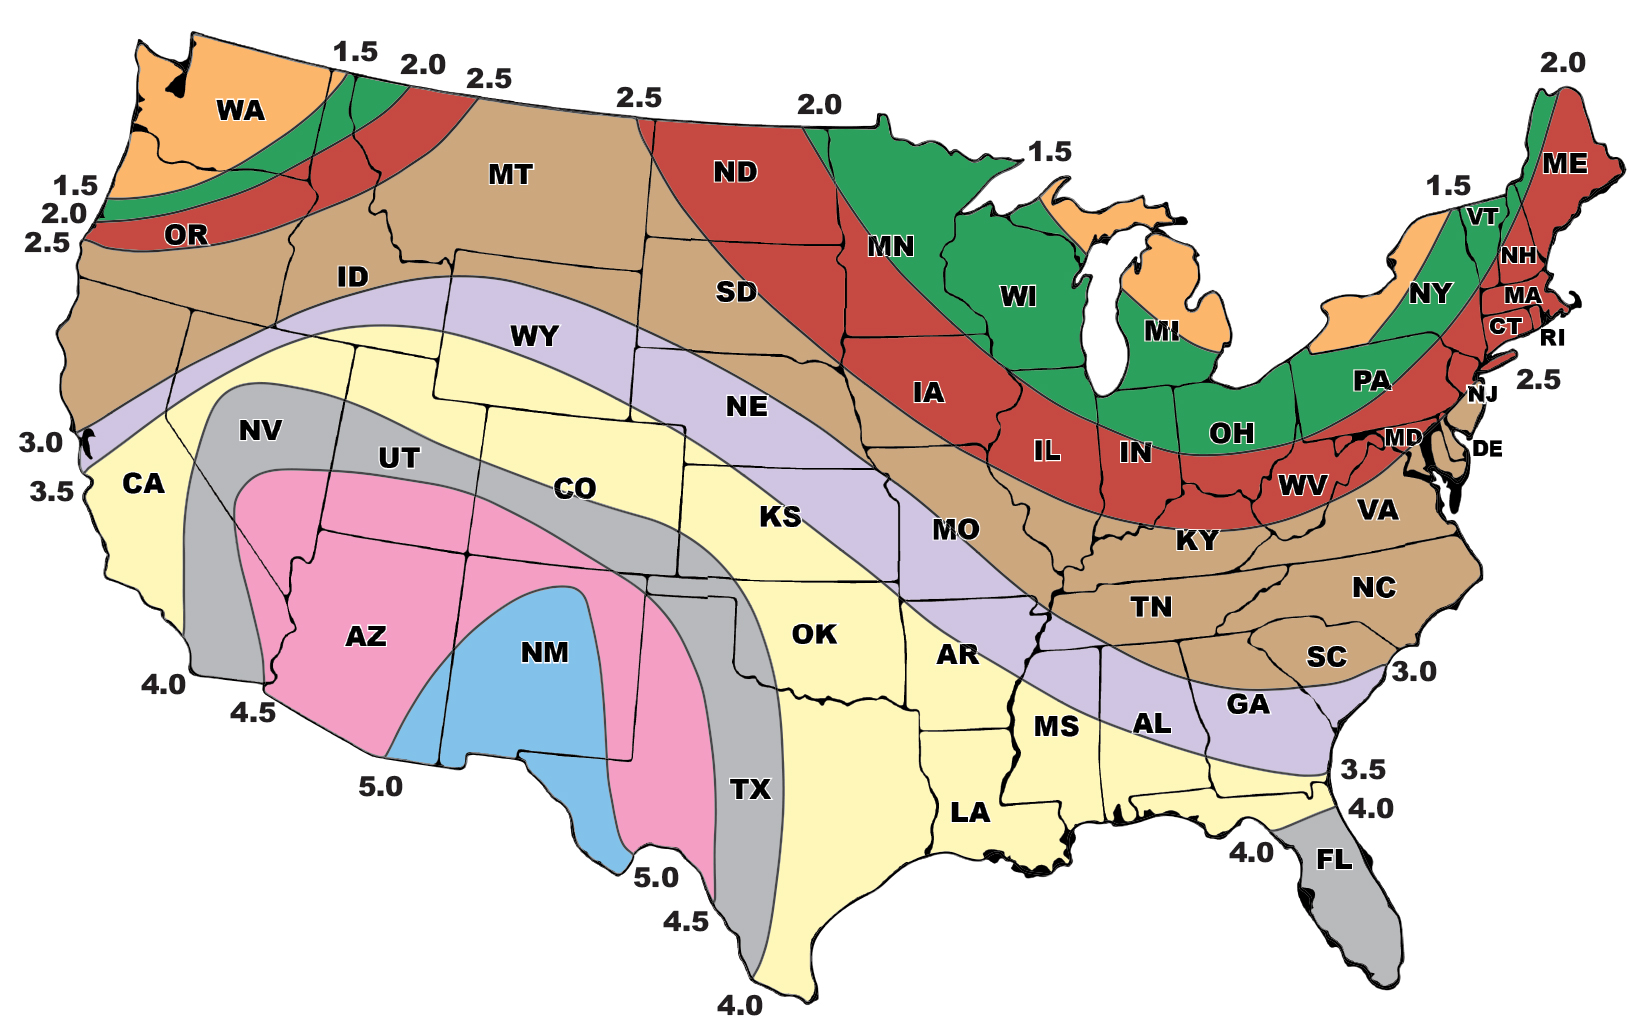
Now the fun part. It's not sunny 24 hrs a day. During the summer months, Premier receives about 5.5 hours of usable sunlight at our farm in SE Iowa (the panels are not tracking the sun). (Charts below indicate average hours of sunlight based on location and time of year.) This means the battery will be the sole power source for 18.5 hours "overnight". That's 1.85A. The panel will have to produce a days worth of energy in only 5.5 hours. That would be 2.4A/5.5 hours = 0.44A per hour. Recall that P=EI, so P = 12V x 0.44A = 5.3 Watts. A 5.3 W panel would provide enough current to run the energizer during the 5.5 hours or sunlight, plus enough current to replace what was used overnight.


Summer sunlight, hours available per average day. 

Winter sunlight, hours available per average day.

What about cloudy days where the panel is not supplying current? Assume Day one was sunny and the battery was topped off at sundown. Day two is cloudy. Sundown to sundown is 24 hrs, plus another 18.5 hours until Day 3 when the sun rises. That's 42.5 hours or 4.25A that needs to be recharged within 5.5 hours. Don't forget we also need to power the energizer until sundown on Day 3, so add .55A to that total, 4.8A. What's the wattage required? 4.8A / 5.5 Hours = 0.87A per hour. P = EI, 12V x .87A = 10.44 W.

The battery size determines the the number of days the energizer will run without sun light. The solar panel determines how many days it will take the battery to recover to full charge after a cloudy day(s).

For those wondering, what size energizer uses 100mA per hour? Most units in the 1 joule output range consume that much power.
If an out-of-box solar energizer kit does not fit your needs, a set-up to fit your situation can be easily designed using the formula above. Happy fencing!

Thursday, January 11, 2018

Staying safe, while staying warm


With winter's cold and damp days, it's no wonder folks are bringing out their heat lamps and putting them to use in lambing barns, brooders and else where. Which makes it a good time to remind folks about proper use with heat lamps and other heat producing items.

A few rules that we follow on the Premier farms:


Do

Hang lamps and heaters secures by clips and chains.  
  1. Unplug the lamp when not in use, or use thermocubes (which automatically turn the lamp off when the ambient temperature is warm enough). 
  2. Use 175 watt bulbs, they produce sufficient heat for most of our needs. 250 watt bulbs cost more to use per hour. The 175w pressed glassed bulbs a very durable. 
  3. Clip lamps securely by the top clip holder, not the cord and do not place chords where animals are likely to reach them—particularly if adult sheep, goats or pigs are exposed to them. A lamp that falls onto animals and or bedding has consequences, including fire. 
  4. Hang carbon fiber heaters higher than heat lamps. They produce significantly more heat and hanging higher allows that heat to dissipate (rather than overheating animals beneath it).
  5. Allow space for animals to get away from heat producing items. 


A heat lamp that is clipped to a PowerBilt panel and whose cord is woven through the panel for added stability. 


Don't

  1. Don't hang lamps closer than 20" from bedding or baby animals that can't move away from them. 
  2. Don't enclose heat lamps in barrels or similar small spaces. The heat must be allowed to move away from the lamps.
  3. Don't use heat lamps any longer than necessary. Lambs and kids only need extra heat when they are wet newborns or weak, or suffering from hypothermia. (We've heard reports of folks using them continuously for 2-3 months.) However, chicks and young poultry need an additional heat source until they are fully feathered.  

Once lambs and kids are dried and past the initial chill, heat lamps can be removed or turned off.  


Thursday, October 5, 2017

Catalog Ready Fence

Even though someone works for a fence supply company (for instance, Premier!), this does not mean that their fences at home are perfect. My fences are one example. Their ages range from 30 to 5 years. Most are a mix of woven, barbed, and electric. They work! After all, it's been a few months since the cattle have escaped, I think I've got all the kinks worked out.

Well I thought so, until I volunteered my pasture/hayfield as a photo opportunity. This meant I needed to get my fences up to snuff.


In this set up, I have a feeder wire carrying the pulse down the fence line to power my temporary subdivision fence. It involves a few components from before my Premier days, they would be the porcelain insulator and the rusty old-style electric fence wire. 

My Premier components are a wood post activator, Tuff-Ring insulator, FiberRod with ScrewOn insulators, harp clips, and IntelliRope 4.5. They're all set-up poorly (by Premier standards), but the voltage on the fence measure 5kv (kilo-volts or 5,000 volts) all summer and the cattle stayed in (they only got out where I didn't have electric fence). 

So what's wrong?
  1. I should be using two conductors, not one continuous length. The vertical section of my conductor puts unnecessary stress on the fine metal filaments. This shortens the usable life of that conductor. 
  2. My wood post activator is meant as an attachment point for gate handles. The TuffRing is not meant to hold conductors that way (90° angle), it works, but once again, it's the wrong way to do things. 
  3. Porcelain insulator, there are a lot of these in use around farms. I've decided I don't care for them, my conductors always fall off until I get the right amount of tension on them. I don't enjoy wrestling a tensioned insulator back into place. 
  4. Rusty fence wire. Rust is corrosion. Corrosion = resistance. Resistance is an obstruction to electrical flow. 
In short, I'm using the wrong insulators in correctly, my conductor is being worn out too quickly and I'm not getting as much energy onto my fenceline as I should. 

What needs to be done to get the fence photo ready?
  1. Replace rusty wire with a proper feeder wire
  2. Run two conductors instead on one-continuous conductor. 
  3. Terminate those conductors with an insulated conductor hook. That will connect to the barbed wire, which is not, nor will be, energized.
  4. Connect feeder wire to conductors via PowerLink. This will provide better metal-to-metal contact on the fence. 


A much better setup. 
  1. Conductivity is improved. Galvanized and stainless steel connections carry the pulse much better than rusty wire. ,
  2. Connecting feeder wire to top conductor at the RopeLink, this offers the best metal to metal contact for transferring the pulse. 
  3. Two conductors terminated with conductor hooks. This reduces stress on my conductor, as well as letting me easily open up the fence to transfer cattle to the next pasture or to drive haying equipment through. 
  4. Switched out my porcelain insulator for a notched PI21 terminal insulator. I kept my old rusty wire to hold it in place, it works just fine for that use. I went with the notched insulator for its ease of sliding the conductor into place. 
Why didn't I set my fence up this way to start? 
Like most farms, you make what you have on hand work. What I had on hand worked, it wasn't perfect but it got the job done. 

The end result? Other than a more eye-appealing fence (my cell-phone pics don't do it justice), my voltage went up! How much? At least 3,000 volts. The tester in the photo measures up to 8kv. My digital voltmeter (which measured the earlier mentioned 5,000 volts) goes up to 9.9kv. I'll get that one out later to see if the voltage went up further than 3kv. 


I made sure to test at the end of my fenceline—the end of the fence gives you the voltage after going through any weed-contact or poor conductors. 

The fence is now ready for photos. I'll go give the cattle a pep-talk for tomorrow. 


Wednesday, September 20, 2017

Goats! Goats! Goats!


If you've been following our Facebook and Instagram pages, you may have noticed that more an more goat photos are being snuck in. What's the reason? Well, we've expanded our goat herd by a little over 40 does. So there's more opportunities for our photographers to snap candids throughout the day.


Expanding the goat numbers has been on the to-do list for some time, but other things on the farm jump ahead from time to time. That is, until recent trip to market our fat wethers. They did quite well. Enough to put goat acquisition to the top of the farm's to do list.


The does complement our ewe-flock too. The farms have a few patches bramble, which makes for poor grazing but great browsing. We could clear it with a few days of chainsaw and clipper work. But that would result in too many doses of poison ivy for our tastes. Simply putting up electric netting and allowing the goats to work was far preferable. Their nimble lips know exactly which leaf to pick and which thorn to avoid. We'll add those photos just as soon as our photo team gets up the gumption to wade through thorns and other pesky plants.


Last that we heard, the buck has been running with the does—kidding photos will be around in about 145 days!


Thursday, March 9, 2017


Miss out on attending Premier’s 2017 Sheep Field Day? Not a problem. You can now view photos and watch the presentations online.
Topics presented included:
  • Lamb quality: What is (and is not) an ideal market lamb, and why.
  • What do lamb buyers (including restaurants, stores and consumers) like and dislike about US and imported lamb as revealed by the American Lamb Board’s extensive nationwide audit.
  • How to succeed (and fail) at growing annual forage crops (rye, turnips, radish) for sheep.
  • Pros and cons of accelerated lambing (lambing more than once per year) illustrated in a 45 minute video of 4 sheep operations in KS, IA, NY and MI.
  • Impact of micro minerals on feeding sheep.
  • Hands-on teaching of critical winter shepherding/lambing skills courtesy of Premier’s 1000 ewes.
  • Lessons learned about Premier’s unique (no drop pen) indoor lambing system.
  • Lessons learned about LAC-TEK’s automatic lamb-rearing machines.
Sign up to receive our emails so you’re always “in-the-know” for upcoming events hosted by Premier.

Wednesday, March 23, 2016

Double yolks, pullets and green eggs.

We don't mind that the eggs in the carton aren't all the same. We prefer it that way because it means our flock is that much more diverse in the field. And of course we'll share an in use image of one of our favorite feeders and egg basket
Premier chicken keeper and occasional catalog copy-editor, Vivian, provided us with an update on the poultry flock on Premier's East Farm—

My flock of 24 pullets are beginning to lay, offering an incredible selection of size and color. The chickens hatched in early October and as fluffy chicks, were models in a number of Premier product photos for the Poultry catalog that was in production at that time.

Oh the potential! Quiche, souffle, omelets galore and so much more. 

The eggs are even more colorful than they appear in the photo. The greenish egg in the center is aqua, and the far right is an olive green.

The flock is at least five breeds, which I've figured out as the chickens matured. The dark red-brown eggs are from the 5 huge New Hampshire Reds; medium brown from 2 Red Star; greenish eggs from an assortment of Ameraucana pullets (which have "lambchop sideburn" feathers on their faces); white from 3 Leghorns; light brown from Black Australorps. Still haven't figured out all the breeds—a small one looks a bit like a pheasant hen. 

What is suspected to be the "pheasant hen." She appears to be a Golden Campine, anyone else have thoughts?
Also, I'm getting quite a few double-yolk eggs, which I never saw from my previous flocks of Wyandottes. Among the eggs shown,  I strongly suspect at least 3 double yolks, just in the past 2-1/2 days. 

Well it's off to a garden symposium for me, which is another sure sign of Spring!


Friday, March 11, 2016

Lambs, tags and getting out of the office!


It's been a long time coming but I was able to get away from my desk and out to the lambing barn.
The smell of fresh bedding and the low rolling tones of ewes talking to their lambs was a pleasant change to the stale coffee and ringing phones of the office.

What's going on outdoors? Well, it's lambing season, all the lambs need to be tagged with their flock ID tag and/or Scrapie tag. The lambs needing tags provided an excellent opportunity to produce a Premier How-to video with the staff.

While in the barn, the farm-crew noticed a lamb that was not in the best of shape. It appeared dehydrated. The lamb was treated and is now on the mend. Its dam only had enough milk for the lamb's stronger sibling, so the ill-lamb was moved to the orphan pen. 

Dehydrated lambs can easily become dead lambs—which results in less lbs produced and less $$ in your pocket. It's easy to miss so be aware. 

Signs a lamb may be dehydrated:

  • Gaunt or not well filled out.  
  • If a twin, triplet, etc—its sibling(s) appears healthier and stronger. 

To determine if a lamb is dehydrated—


Pinch the skin along the back. After pinching:


If the skin stays momentarily tented or peaked, the lamb is dehydrated. Immediately treat the lamb (consult your veterinarian for proper procedure). 

Causes of dehydration:

  • Scours. 
  • Ewe lacks adequate milk to support the lamb(s).
  • Larger/stronger siblings outcompete their sibling for milk.
  • The lamb has sharp teeth and the ewe won't let it feed.  

If a lamb appears unhealthy but is not dehydrated, consult your veterinarian. 


With the lamb cared for we were able to continue on with the How-to video. The shepherd, Heather, demonstrated proper eartag procedure while longtime consultant, Gordon, provided voiceover narration. 

Topics covered were:

  • Lubricating tags—this provides easier insertion for those with weaker hands. 
  • Proper tag placement—in the center of the ear and away from any veins. 
  • Applying Catron IV fly spray during fly season. 
  • Making sure that there is room for ear growth if using loop tags.

A quick note: the tag applicators below may differ but the process is the same for each style of tag. 


Applying SuperLube.


Finding the veins to determine proper placement. 


Applying Catron IV to ward off flies. 


Providing room for the ear to grow (when using loop tags). 


It's lambing season therefore it's also ear-tagging season at Premier. Premier Shepherd Heather is applying antiseptic SuperLube to an eartag prior to insertion. 


Friday, February 26, 2016

Importance of energizer output in tall-grass

If the grass gets this tall, mow it! 

We all know that electric fence and grass contact don't go together all that well. The energizer sends the pulse through the fence, the grass leeches energy from the fence so that there is less energy when an animal touches the fence.

But overcoming grass contact is possible if a higher output (more joules) energizer is used. How does this work? By sending more energy through the fence than the grass can leech, you will have more available energy when animal contact is made to the fence.

If you're expecting significant grass contact (though not as much in the photo above) consider going with a higher output unit. Consult us (800-282-6631) if you have any questions.

Wednesday, February 3, 2016

Chicken Nipple Waterer Tips

Premier's Heated Poultry Water, Chick Nipple Waterer and Bucket Nipple Waterer

For those having trouble getting their chickens to drink from a nipple type waterer, here are a few tips:
  • Remove alternative sources of water. If a trough type is available, chickens will use it instead of the nipple drinker. 
  • Tap the nipple with a finger. The resulting sound and water drop will draw the birds' attention—they will investigate the source. 
  • Take a bird and hold its head to the nipple. Touch its beak to the nipple so the animal knows where to get water. 


Friday, January 29, 2016

A major fence energizer mis-truth

Those who have researched energizers have more than likely (almost certainly to be exact) encountered the Miles or Acres claims on energizers.

That's too bad, as this often causes folks to purchase an energizer that is too small for their fencing needs. How so? The number of miles or acres advertised roughly energizes a single strand conductor, above the ground (no grass contact) with moist soils for that distance—essentially lab conditions.

In comparison—an in use energizer's field conditions involve moist or dry soils, one or many conductors of varying conductivity and grass contact—much more resistance to and drainage of the energizer's pulse.

Points to consider regarding overall fence resistance and pulse strength:
  • Poor conductors (high ohms = high resistance) inefficiently carry an energizer's pulse throughout the fence line. 
  • Multiple conductors increase a fence's overall resistance. 
  • Grass contact (weed-load) drains energy from a fence. 
  • Dry soils lack the conductivity to adequately carry an energizer's pulse back to the negative terminal of the energizer. 
An accurate way to gauge an energizer's performance is its joules of output rating. A joule is the volume of electrical energy in a pulse. The higher the joules, the more energy available (after loss to weed and poor conductivity) to be sent down the fence—the larger the pulse, the higher its strength at the end of the fence.

But how many joules are needed for a specific fence?

The answer is it depends. A rule of thumb some go by is .25 joules per roll of net. Gordon (a Premier Consultant) goes by .5 joules per 3-5 nets (ElectroNet) if you maintain weed-load. That means if you keep the grass short enough (not totally eliminated) you should be able to get 3-5 rolls of 164' net energized (depending on soil conditions).

For more tips on choosing a fence energizer, read this blog-post. It goes over how to use our Energizer Comparison charts.

The miles rating is certainly an effective way to sell energizers but it doesn't say what the voltage will be at the end of that wire—there may be some, but possibly not enough to deter animals.

Wednesday, January 27, 2016

Fence connections (temporary)


There are right ways and wrong ways to bring power to a fence. The wrong ways often go unnoticed until the voltage drops and the livestock take a trek to the neighbor's garden. 

The cause (for this post) is insufficient metal-metal contact. If contact is poor, the pulse is still going to travel through the fence, but with a few added hiccups. Instead of directly traveling from the powerlink to the conductor, it has to 'jump' to make the connection. This jump is called arcing. 


The conductor above featured a poor connection so arcing occurred. This caused both the plastic and metal filaments to burn out. 


How to avoid poor connections—
If connecting at the end of a roll or net (or junction of two rolls), connect to the metal clip at the end of the net. This will provide the best metal connection (more metal to metal contact). 


If connecting at the middle of a net (or length of twine), wrap some MaxiShock around the superconductor (green/white strand on netting) or twine, then connect the clip. The MaxiShock will contact the conductors (in the twine) at more points than simply clipping to the net. 


If connecting to 4.5mm (or larger) conductors—wrap a RopeLink around the conductor (below). The rope link will touch the metal filaments at more points and provide a better connection. 


How to use a prolapse harness

How does it work? When a ewe strains, her neck drops and her back arches. This pulls the cross webbing of the harness tighter against the vulva and also pulls the retainer (if one is used) into the ewe. Most ewes soon cease to strain. 


Lay the harness along the ewe's back (adjustment buckle should sit near ewe's head).


Attach neck strap at base of neck and tighten so it remains comfortable.


Place tail through top hole (vaginal opening just appears through lower hole).


Take the rear leg straps and pass between the ewe's back legs, one on each side of the udder and snap into buckles on back strap (ensure that you do not trap the udder). Tighten the leg straps so they grip firmly.


Push the prolapse back into the ewe (contrary to the photo above, we strongly advise wearing gloves while doing so).
Adjust back buckle so the ewe cannot strain or push.


Check tension regularly to avoid chafing and manure build up.

Although it is possible (in most cases) for the ewe to lamb with the harness in place, we suggest that the harness be removed immediately prior to lambing.

Friday, January 22, 2016

Electric fence basics: Conductivity


An energizer sends a pulse (measured in joules) through the fence. When an animal touches the fence the pulse travels through them, to the soil and to the ground rod. The pulse travels from the ground rod to the energizer completing the circuit.

Conductivity is the measure of how easily an energizer's pulse flows through the electric fence. Better conductivity results in a more consistent pulse (no loss of strength) from the energizer to the end of the fence. 

The lower the conductivity, the higher the ohms. More ohms = higher resistance to the flow of the energizer's pulse.

Low conductivity means more resistance to the pulse (measured in ohms).
  • Low ohms = low resistance
  • High ohms = high resistance
How does this information apply to an electric fence?
The pulse is made up of a group of electrons that travels through the fence circuit. Over distance (throughout the circuit), the pulse loses electrons—similar to erosion—from the resistance. More resistance = more electron loss. The fewer available electrons at the point of contact/end of fence, the weaker the felt pulse.

The better the conductivity, the fewer electrons lost, better possibility for a deterring shock.

Dry/rocky/sandy soils tend to lack moisture, which results in poor conductivity. The best way to try and overcome this is to use wide-impedance energizers, increase the total feet energizer grounding (ground rods) or use pos/neg fence.

Build fences with low ohm conductors. This includes the majority of our white or green netting, black and white conductors and MaxiShock. This will aid in lowering the overall resistance of the fence.


Tuesday, January 19, 2016

Heat Lamp Dos and Don'ts

Heat Lamp DO’s
  1. Use 175 watt bulbs. 250 watt bulbs cost more to use and, in our experience, are rarely needed.
  2. Use PAR (pressed glass) bulbs. Far more durable and last longer.
  3. Tie or clip the lamps very securely—A lamp that fall onto animals and/or bedding has consequences that can be very serious—including fire.  

Heat Lamp DON’Ts
  1. Don’t hang them closer than 20" to bedding or baby animals that can't move away from them. If using to brood chicks, the lamp may be lowered as far as 12" above the ground. 
  2. Don’t enclose them in barrels or similar small spaces. The heat must be allowed to move away from the lamp.
  3. Don’t use longer than necessary. We hear reports of folks using them continuously for several months. If you need to do this, buy the black Prima Heat Lamp. 
    Lambs and kids only need extra heat when they are wet newborns or weak or suffering from hypothermia.

Monday, December 14, 2015

Big Bale Feeders

For those that are breaking out their round bales for winter feeding, here are a few tips when it comes to using Premier's Big Bale Feeders.


  • We find 4 ft diameter bales to be optimal. 5ft and larger bales leave a core in the center of the feeder (sheep can't reach that far). This core needs to be knocked down by the shepherd. We find the added materials (twine, net, wrap) needed to make smaller bales are offset by the convenience and ease of handling. 
  • Remember, these are meant for polled (hornless) sheep and goats. We advise against their use with horned animals and livestock larger than sheep/goats. 
  • Do not attempt to lift the panels out of frozen soil with a tractor. This is an excellent way to break welds and bend rods. 
  • No more than 8 ewes per panel. Overcrowding leads to injuries. 
  • Don't turn out starving livestock with the feeders. Hungry sheep are aggressive sheep. 

Thursday, December 10, 2015

A quick poultry feeder hint

Large cone feeders, finely ground poultry feeds and humid environments do not mix. 
Here's why: 
  1. Fine feeds are easily compacted when pressure is applied
  2. A full feeder puts pressure on the feed at the bottom—this compacts the feed. 
  3. Moisture in the air further aids the binding/compaction of fine feeds. When dried, the result is the chicken feed equivalent of concrete.  
What to do? 
  • Feed coarsely ground feeds in humid seasons (be sure to provide supplemental grit). 
  • If continuing with finely ground feeds, use smaller feeders (for less pressure). 
  • If the feeder can be adjusted, set the feed flow for a faster rate. This will allow fine feed to flow easier when humid.