Friday, January 29, 2016

A major fence energizer mis-truth

Those who have researched energizers have more than likely (almost certainly to be exact) encountered the Miles or Acres claims on energizers.

That's too bad, as this often causes folks to purchase an energizer that is too small for their fencing needs. How so? The number of miles or acres advertised roughly energizes a single strand conductor, above the ground (no grass contact) with moist soils for that distance—essentially lab conditions.

In comparison—an in use energizer's field conditions involve moist or dry soils, one or many conductors of varying conductivity and grass contact—much more resistance to and drainage of the energizer's pulse.

Points to consider regarding overall fence resistance and pulse strength:
  • Poor conductors (high ohms = high resistance) inefficiently carry an energizer's pulse throughout the fence line. 
  • Multiple conductors increase a fence's overall resistance. 
  • Grass contact (weed-load) drains energy from a fence. 
  • Dry soils lack the conductivity to adequately carry an energizer's pulse back to the negative terminal of the energizer. 
An accurate way to gauge an energizer's performance is its joules of output rating. A joule is the volume of electrical energy in a pulse. The higher the joules, the more energy available (after loss to weed and poor conductivity) to be sent down the fence—the larger the pulse, the higher its strength at the end of the fence.

But how many joules are needed for a specific fence?

The answer is it depends. A rule of thumb some go by is .25 joules per roll of net. Gordon (a Premier Consultant) goes by .5 joules per 3-5 nets (ElectroNet) if you maintain weed-load. That means if you keep the grass short enough (not totally eliminated) you should be able to get 3-5 rolls of 164' net energized (depending on soil conditions).

For more tips on choosing a fence energizer, read this blog-post. It goes over how to use our Energizer Comparison charts.

The miles rating is certainly an effective way to sell energizers but it doesn't say what the voltage will be at the end of that wire—there may be some, but possibly not enough to deter animals.

Wednesday, January 27, 2016

Fence connections (temporary)


There are right ways and wrong ways to bring power to a fence. The wrong ways often go unnoticed until the voltage drops and the livestock take a trek to the neighbor's garden. 

The cause (for this post) is insufficient metal-metal contact. If contact is poor, the pulse is still going to travel through the fence, but with a few added hiccups. Instead of directly traveling from the powerlink to the conductor, it has to 'jump' to make the connection. This jump is called arcing. 


The conductor above featured a poor connection so arcing occurred. This caused both the plastic and metal filaments to burn out. 


How to avoid poor connections—
If connecting at the end of a roll or net (or junction of two rolls), connect to the metal clip at the end of the net. This will provide the best metal connection (more metal to metal contact). 


If connecting at the middle of a net (or length of twine), wrap some MaxiShock around the superconductor (green/white strand on netting) or twine, then connect the clip. The MaxiShock will contact the conductors (in the twine) at more points than simply clipping to the net. 


If connecting to 4.5mm (or larger) conductors—wrap a RopeLink around the conductor (below). The rope link will touch the metal filaments at more points and provide a better connection. 


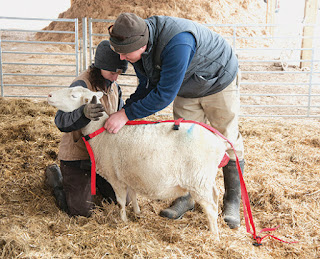
How to use a prolapse harness

How does it work? When a ewe strains, her neck drops and her back arches. This pulls the cross webbing of the harness tighter against the vulva and also pulls the retainer (if one is used) into the ewe. Most ewes soon cease to strain. 


Lay the harness along the ewe's back (adjustment buckle should sit near ewe's head).


Attach neck strap at base of neck and tighten so it remains comfortable.


Place tail through top hole (vaginal opening just appears through lower hole).


Take the rear leg straps and pass between the ewe's back legs, one on each side of the udder and snap into buckles on back strap (ensure that you do not trap the udder). Tighten the leg straps so they grip firmly.


Push the prolapse back into the ewe (contrary to the photo above, we strongly advise wearing gloves while doing so).
Adjust back buckle so the ewe cannot strain or push.


Check tension regularly to avoid chafing and manure build up.

Although it is possible (in most cases) for the ewe to lamb with the harness in place, we suggest that the harness be removed immediately prior to lambing.

Friday, January 22, 2016

Electric fence basics: Conductivity


An energizer sends a pulse (measured in joules) through the fence. When an animal touches the fence the pulse travels through them, to the soil and to the ground rod. The pulse travels from the ground rod to the energizer completing the circuit.

Conductivity is the measure of how easily an energizer's pulse flows through the electric fence. Better conductivity results in a more consistent pulse (no loss of strength) from the energizer to the end of the fence. 

The lower the conductivity, the higher the ohms. More ohms = higher resistance to the flow of the energizer's pulse.

Low conductivity means more resistance to the pulse (measured in ohms).
  • Low ohms = low resistance
  • High ohms = high resistance
How does this information apply to an electric fence?
The pulse is made up of a group of electrons that travels through the fence circuit. Over distance (throughout the circuit), the pulse loses electrons—similar to erosion—from the resistance. More resistance = more electron loss. The fewer available electrons at the point of contact/end of fence, the weaker the felt pulse.

The better the conductivity, the fewer electrons lost, better possibility for a deterring shock.

Dry/rocky/sandy soils tend to lack moisture, which results in poor conductivity. The best way to try and overcome this is to use wide-impedance energizers, increase the total feet energizer grounding (ground rods) or use pos/neg fence.

Build fences with low ohm conductors. This includes the majority of our white or green netting, black and white conductors and MaxiShock. This will aid in lowering the overall resistance of the fence.


Tuesday, January 19, 2016

Heat Lamp Dos and Don'ts

Heat Lamp DO’s
  1. Use 175 watt bulbs. 250 watt bulbs cost more to use and, in our experience, are rarely needed.
  2. Use PAR (pressed glass) bulbs. Far more durable and last longer.
  3. Tie or clip the lamps very securely—A lamp that fall onto animals and/or bedding has consequences that can be very serious—including fire.  

Heat Lamp DON’Ts
  1. Don’t hang them closer than 20" to bedding or baby animals that can't move away from them. If using to brood chicks, the lamp may be lowered as far as 12" above the ground. 
  2. Don’t enclose them in barrels or similar small spaces. The heat must be allowed to move away from the lamp.
  3. Don’t use longer than necessary. We hear reports of folks using them continuously for several months. If you need to do this, buy the black Prima Heat Lamp. 
    Lambs and kids only need extra heat when they are wet newborns or weak or suffering from hypothermia.